openssl genrsa -aes256 -out ./<private-key-name>.key 4096
Practical TLS/SSL and X.509 used in real world scenarios
Posted by nerdcoding on January 20, 2019
In my last blog post, I laid the foundation in How TLS/SSL and X.509 really works. Here I will provide the practical part. How to generate private and public keys. How the create self-signed certificates and certificate chains. How do you get a certificate signed by a real certificate authority (CA). And how to integrate all this into an nginx web server and a self-developed Spring Boot server.
Create Certificate with OpenSSL
Private key
The first step is to generate an RSA private key. The private key should not be saved in plaintext but encrypted with
AES256. Therefore a password is always needed for decryption when the private key is accessed. Anymore as the length
of the private we use 4096 bit:
Verify the private key:
openssl rsa -in <private-key-name>.key -check
Generate X.509 CSR (Certificate Signing Request)
Before a certificate could be signed a Certificate Signing Request (CSR) is needed. Such a CSR contains the public key, the counterpart to the private key, and some additional information about the person or organization that would like to have it’s CSR signed. As hash algorithm we choose SHA256. Google announced a few years ago, that certificate chains using SHA-1 will no longer appear to be fully trustworthy in Chrome.
openssl req -new -sha256 -key ./<private-key-name>.key -out ./<csr-name>.csr
When this command is executed, the password of the private key is needed and the additional information needs to be provided. These are:
-
Country Name (2 letter code) - C
-
State or Province Name (full name) - ST
-
Locality Name (eg, city) - L
-
Organization Name (eg, company) - O
-
Organizational Unit Name (eg, section) - OU
-
Common Name (e.g. server FQDN or YOUR name) - CN
The common name is important and needs to be the fully qualified domain (FQDN) of the server the certificate is integrated. Only when the servers DNS name and the CN of the certificate matches, the browser will consider the certificate as safe (→ Common Name Mismatch problem).
Verify the Certificate Signing Request:
openssl req -noout -text -in ./<csr-name>.csr
Create self-signed X.509 certificate
To self-sign the certificate, take the CSR and sign it with the previously generated private key. Each certificate must
have a validity period which could be parameterized with the -days flag:
openssl x509 -signkey ./<private-key-name>.key -in ./<csr-name>.csr -req -days 365 -out <certificate-name>.crt
Verify the created X.509 certificate:
openssl x509 -text -noout -in <certificate-name>.crt
Create self-signed X.509 certificate chain
In the last step, the certificate signed itself with its own private key. When a whole certificate chain is needed we also create a self-signed root certificate. But then all the following certificates are signed with the previous one. We create a self-signed root certificate:
-- Create RSA private key
openssl genrsa -aes256 -out root.key 4096

-- Create a Certificate Signing Request (CSR)
openssl req -new -sha256 -key root.key -out root.csr -subj "/C=DE/ST=Hamburg/L=Hamburg/O=My Company Ltd/CN=root.example.com"

-- Create self-signed certificate
openssl x509 -signkey root.key -in root.csr -req -days 730 -out root.crt
The next certificate in the chain is the grandparent certificate, which is now signed by the previously created root certificate:
-- Create RSA private key
openssl genrsa -aes256 -out grandparent.key 4096

-- Create a Certificate Signing Request (CSR)
openssl req -new -sha256 -key grandparent.key -out grandparent.csr -subj "/C=DE/ST=Hamburg/L=Hamburg/O=My Company Ltd/CN=grandparent.example.com"

-- Create certificate signed by the root certificate
openssl x509 -CA root.crt -CAkey root.key -CAcreateserial -in grandparent.csr -req -days 365 -out grandparent.crt
Then we repeat this step to times and create a parent certificate, signed by the grandparent certificate:
-- Create RSA private key
openssl genrsa -aes256 -out parent.key 4096

-- Create a Certificate Signing Request (CSR)
openssl req -new -sha256 -key parent.key -out parent.csr -subj "/C=DE/ST=Hamburg/L=Hamburg/O=My Company Ltd/CN=parent.example.com"

-- Create certificate signed by the grandparent certificate
openssl x509 -CA grandparent.crt -CAkey grandparent.key -CAcreateserial -in parent.csr -req -days 365 -out parent.crt
And a server certificate, signed by the parent certificate:
-- Create RSA private key
openssl genrsa -aes256 -out server.key 4096

-- Create a Certificate Signing Request (CSR)
openssl req -new -sha256 -key server.key -out server.csr -subj "/C=DE/ST=Hamburg/L=Hamburg/O=My Company Ltd/CN=server.example.com"

-- Create a certificate signed by the parent certificate
openssl x509 -CA parent.crt -CAkey parent.key -CAcreateserial -in server.csr -req -days 365 -out server.crt
Now we can combine all these certificates to a certificate chain. Simply use cat to concatenate each file:
cat server.crt parent.crt grandparent.crt root.crt > chain.pem
Sign certificate by a trusted certificate authority
Let’s encrypt is a free certificate authority (CA) which provides many ways to obtain a signed certificate which is considered as safe by the most browser. To obtain a certificate by let’s encrypt you need a real DNS name accessible by the let’s encrypt servers.
Securing nginx with TLS/SSL
Our recently created self-signed certificate chain (chain.pem) and the associated private key (server.key) could be integrated into an nginx web server installation and used to secure a connection to nginx with TLS/SSL. Anymore the
private key is needed by nginx to decrypt incoming messages. During the private key creation, we encrypted the private
key with AES256 so that a password is needed to read the key. During every server startup of nginx the server prompts
for this password. To prevent this firstly we remove the encryption from the private key:
openssl rsa -in server.key -out server.keynopass
Then in the nginx.conf we simply configure two servers. One listening on the default port 80 and redirects requests
to port 443 (https). And the second one listens on port 443 with the SSL configuration. Here the private key
server.keynopass and the self-signed certificate chain chain.pem needs to be provided.
 worker_processes  1;
 events {
   worker_connections  1024;
 }

 http {
     include       /etc/nginx/mime.types;
     default_type  application/octet-stream;

     log_format  main  '$remote_addr - $remote_user [$time_local] "$request" '
                       '$status $body_bytes_sent "$http_referer" '
                       '"$http_user_agent" "$http_x_forwarded_for"';

     access_log  /var/log/nginx/access.log  main;

     sendfile        on;
     keepalive_timeout  65;

     # Forward requests to port 443 (https)
     server {
         listen 80 default_server;
         listen [::]:80 default_server;
         server_name _;
         return 301 https://$host$request_uri;
     }


     server {
         listen              443 ssl;
         server_name         localhost;
         ssl_certificate     ./chain.pem
         ssl_certificate_key ./server.keynopass;
         ssl_protocols       TLSv1 TLSv1.1 TLSv1.2;
         ssl_ciphers         HIGH:!aNULL:!MD5;

         location / {
             root   /usr/share/nginx/html;
             index  index.html index.htm;
         }
     }
 }
When we now start our nginx server and let our browser send a request, the browser will show a warning that the connection is not private:
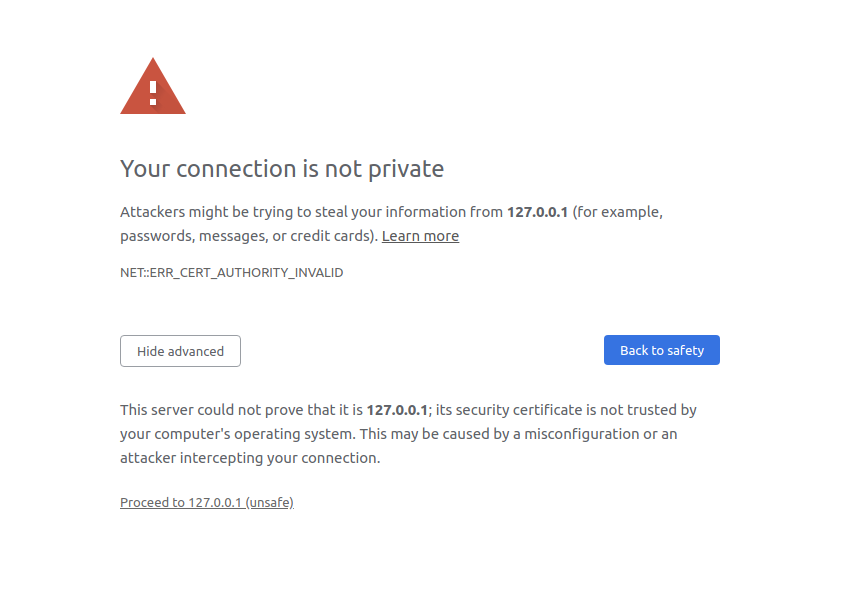
Each browser keeps a list of trustworthy CAs and when a server provides a certificate, the browser checks if this
certificate was signed by one of these CAs and if so, asks the CA if the certificate is valid. In our case the
certificate was self-signed and the browser marks it as ERR_CERT_AUTHORITY_INVALID. With Advanced → Proceed to…
we can ignore this error message and force the browser to accept this TLS/SSL connection anyway.
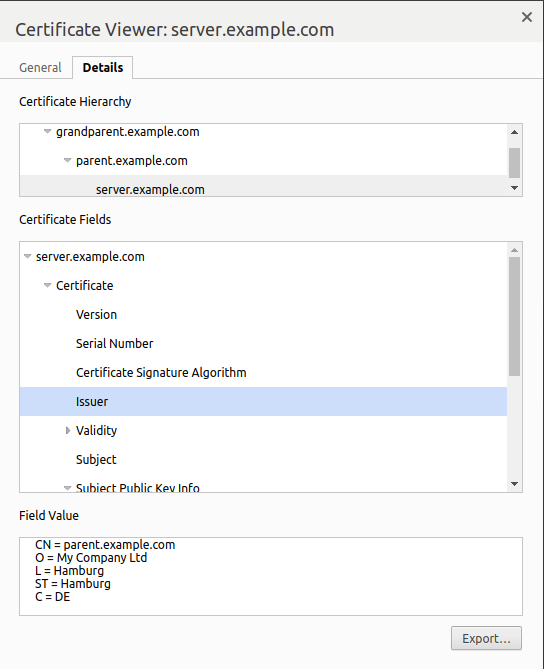
The browsers certificate viewer will now show the previously created certificate chain:
Securing a Java Spring Boot application with TLS/SSL
When using TLS/SSL for Java applications we normally wouldn’t directly use the private key and certificate chain. Both
are encapsulated into a Java KeyStore. To create a KeyStore JDKs default keytool could be used. The most simple way
is to combine both, the certificate chain and the private key in an PKCS#12
archive file format and then use this .p12 file to create a Java KeyStore. First create PKCS#12 file:
openssl pkcs12 -export -in chain.pem -inkey server.key -certfile chain.pem -name server -out server.p12
And then the Java KeyStore:
keytool -importkeystore -srckeystore server.p12 -srcstoretype pkcs12 -destkeystore java-key-store.jks -deststoretype JKS
To check the KeyStore use:
keytool -list -v -keystore <keystore-name>.jks
Finally, we could use the created Java KeyStore to integrate into a Spring Boots application.properties (or
application.yml) to secure connections to this application with TLS/SSL.
application.properties
server.port=8443

server.ssl.enabled=true
server.ssl.key-store-type=JKS
server.ssl.key-store=/path/to/java-key-store.jks # (or server.ssl.key-store=classpath:java-key-store.jks)
server.ssl.key-store-password=secret
server.ssl.key-alias=server