Secure RESTful Web Services with Spring Security and JWT
Posted by nerdcoding on November 5, 2016
In this tutorial we will secure the access to RESTful web services which should only be accessible for authenticated users. The securing and the authentication is done with Spring Security. Anymore we will implement a authentication mechanism generating JSON Web Tokens (JWT). They are used by the client to make authenticated calls to the secured web services.
A fully working example could be found at https://github.com/nerdcoding/angular2-spring-boot. This example consists of an Angular2 client application and the server application described in this tutorial. You can ignore the client application if you are only interested in the server part.
Web Services
In our example we have a domain class (entity) User. A user is able to login into the application. Among other
information, instances of this class holds the username and password. On top of domain classes are web
services. All web services needs to be secured, that means only authenticated users are allowed to call them. There is
only one exception for the web service which is responsible to handle the authentication process. In our example we will
write a not secured LoginRestController. This web service contains a login operation which is responsible for the
authentication of a user. A client needs to provide some credentials (username + password) and if these are valid a
security token is generated and send back to the calling client.
How JSON Web Token (JWT) works
A RESTful web service allows manipulation of resources by a defined set of stateless operations. Because of the stateless aspect all information regarding to a session state are hold on the client. The client need to manage all session information by itself and with any service request necessary information have to be provided in that request. That means there is never some form of server side session.
But how the server is able to distinguish between authenticated and not-authenticated users? That’s were the JSON Web
Token (JWT) comes into play. JWT is an open standard (RFC 7519) that defines a token
which could be transferred between two parties. In our case such an token is generated during the authentication in our
LoginRestConroller and returned back to the client. Now the client could send this token with all subsequent requests
to secured web services. The token is send inside of an HTTP header. Spring Security will detect that there is an
incoming request to an secured resource, it will check if that request provides a JSON Web Token and if so, if that
token is valid. A token is only valid if it could be associated to an already authenticated user.
The code: Implement the authentication scenario
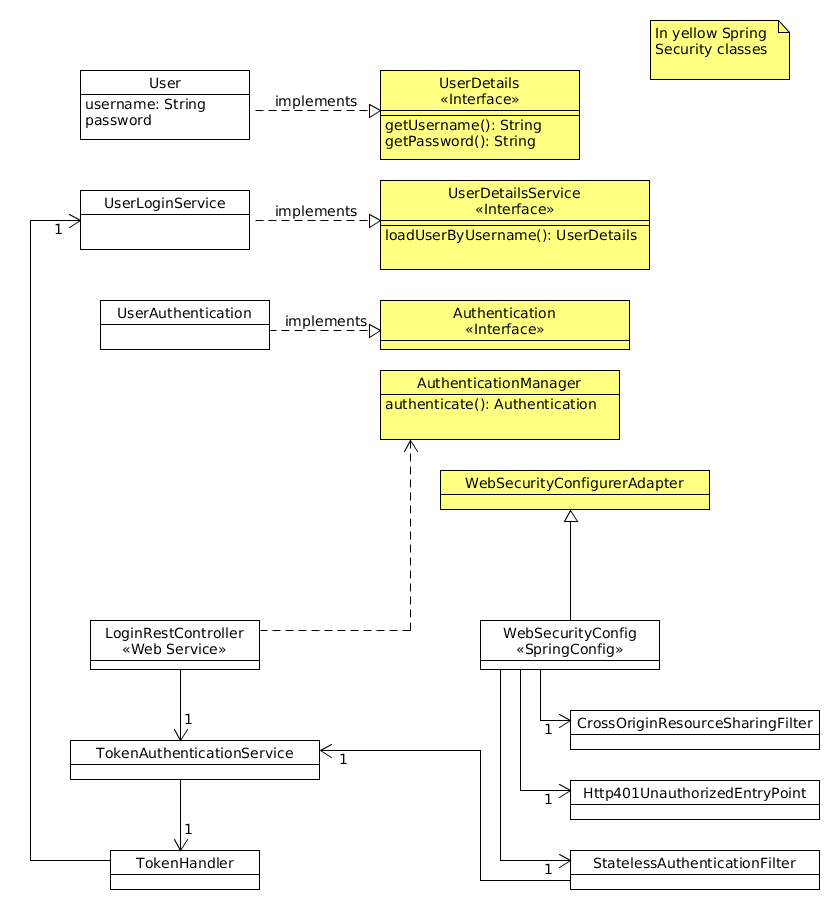
Lets get our hands dirty and do some hacking. First of all a overview with the main parts of our implementation.
Authentication process
The authentication process is were a client send username and password to a login web service and, if the authentication
was successful, the client gets a new generated JSON Web Token in return. First of all we need to configure Spring
Security and we do that with a WebSecurityConfigurer.
WebSecurityConfigurer
@Configuration
@EnableWebSecurity
public class WebSecurityConfig extends WebSecurityConfigurerAdapter {

    @Autowired
    private Http401UnauthorizedEntryPoint http401UnauthorizedEntryPoint;
    @Autowired
    private StatelessAuthenticationFilter statelessAuthenticationFilter;
    @Autowired
    private CrossOriginResourceSharingFilter crossOriginResourceSharingFilter;
    @Autowired
    private UserLoginService userLoginService;

    @Override
    protected void configure(HttpSecurity http) throws Exception {
        http
            .csrf()
            .disable()
            .sessionManagement()
            .sessionCreationPolicy(SessionCreationPolicy.STATELESS) (1)
            .and()
            .exceptionHandling()
            .authenticationEntryPoint(http401UnauthorizedEntryPoint)
            .and()
            .authorizeRequests()
            .antMatchers("/login/**").permitAll() (2)
            .anyRequest().authenticated() (3)
            .and()
            .addFilterBefore(crossOriginResourceSharingFilter,
                    ChannelProcessingFilter.class)
            .addFilterBefore(statelessAuthenticationFilter,
                    UsernamePasswordAuthenticationFilter.class);
    }

     @Override
     protected void configure(final AuthenticationManagerBuilder auth) throws Exception {
        auth.userDetailsService(userLoginService); (4)
     }

     @Override
     @Bean // Enable autowiring of "AuthenticationManager" (e.g. LoginController)
     public AuthenticationManager authenticationManagerBean() throws Exception {
        return super.authenticationManagerBean();
     }
}-
We have previously said that our server never should save any client state. Here we configure in Spring Security, that a HTTP session not be created.
-
The login web service is not secured and all clients are permitted to send requests.
-
All other web services only allow requests from authenticated clients.
-
UserLoginServiceimplements Springs interfaceUserDetailsServiceand is a small service responsible to load aUserby username.
Don’t worry about the other parts of the WebSecurityConfig, they will be explained a little bit later. The main entry
point to begin an authentication process is the LoginRestController.
LoginRestController
@RestController
public class LoginRestController {

    @Autowired
    private AuthenticationManager authenticationManager;

    @Autowired
    private TokenAuthenticationService tokenAuthenticationService;

    @RequestMapping(value = "/login", method = RequestMethod.POST)
    public JwtAuthenticationResponse login(
            @RequestBody final JwtAuthenticationRequest authenticationRequest) {
        final UserAuthentication authentication =
            performAuthentication(authenticationRequest);
        final String jwtToken =
            tokenAuthenticationService.createJwtTokenforAuthentication(authentication);

        return new JwtAuthenticationResponse(jwtToken);
    }

    private UserAuthentication performAuthentication(
            final JwtAuthenticationRequest authenticationRequest) {
        final UsernamePasswordAuthenticationToken authenticationToken =
            new UsernamePasswordAuthenticationToken(
                    authenticationRequest.getUsername(), authenticationRequest.getPassword());

        final Authentication authentication =
            authenticationManager.authenticate(authenticationToken);
        return new UserAuthentication((User) authentication.getPrincipal());
    }

}
This web service receives the clients request containing the username and password (encapsulated in an
JwtAuthenticationRequest). With this credentials Springs AuthenticationManager is called which attempts
to authenticate the user. Therefore Spring Security use our UserLoginService to load the User instance form database
and check the provided password. If the authentication was successful we get an UserAuthentication containing our
authenticated User. In the last step with the TokenAuthenticationService we create a JSON Web Token which is returned
to the client.
TokenAuthenticationService
@Service
public class TokenAuthenticationService {

    @Autowired
    private TokenHandler tokenHandler;

    public String createJwtTokenforAuthentication(final UserAuthentication authentication) {
        return tokenHandler.createTokenForUser(authentication.getDetails());
    }
}
The TokenAuthenticationService only delegates the token creation to the TokenHandler.
TokenHandler
public class TokenHandler {

    private final static byte[] JWS_SECRET = "SECRET".getBytes(StandardCharsets.UTF_8);

    public String createTokenForUser(final User user) {
        return Jwts.builder()
            .setSubject(user.getUsername())
            .claim("name", user.getFirstName() + " " + user.getLastName())
            .setExpiration(DateTime.now().plusHours(1).toDate())
            .signWith(SignatureAlgorithm.HS256, JWS_SECRET)
            .compact();
    }

}
And the TokenHandler finally creates the JSON Web Token with the library Java JWT.
Use the JSON Web Token for authenticated requests
After a successful authentication process the client receives a JSON Web Token which could now be used to call secured
web services. All the client needs to do is put the token inside of the HTTP header X-AUTH-TOKEN with each request. On
the server side we need to check the provided token and, if it is valid, we automatically create an Authentication so
that the call to a secured web service is possible. Let’s revisit the WebSecurityConfigurer.
WebSecurityConfigurer
@Configuration
@EnableWebSecurity
public class WebSecurityConfig extends WebSecurityConfigurerAdapter {

    @Autowired
    private Http401UnauthorizedEntryPoint http401UnauthorizedEntryPoint;
    @Autowired
    private StatelessAuthenticationFilter statelessAuthenticationFilter;
    @Autowired
    private CrossOriginResourceSharingFilter crossOriginResourceSharingFilter;
    @Autowired
    private UserLoginService userLoginService;

    @Override
    protected void configure(HttpSecurity http) throws Exception {
        http
            .csrf()
            .disable()
            .sessionManagement()
            .sessionCreationPolicy(SessionCreationPolicy.STATELESS)
            .and()
            .exceptionHandling()
            .authenticationEntryPoint(http401UnauthorizedEntryPoint) (1)
            .and()
            .authorizeRequests()
            .antMatchers("/login/**").permitAll()
            .anyRequest().authenticated()
            .and()
            .addFilterBefore(crossOriginResourceSharingFilter,
                    ChannelProcessingFilter.class) (2)
            .addFilterBefore(statelessAuthenticationFilter,
                    UsernamePasswordAuthenticationFilter.class); (3)
    }

    [...]
}-
When a secured web service is accessed without a valid token, the
Http401UnauthorizedEntryPointensures that the HTTP response code is 401 "Unauthorized". -
Handles the Cross-origin resource sharing (CORS). I will come back to that later.
-
StatelessAuthenticationFilteris the entry point that checks if a valid JSON Web Token is provided.
The Http401UnauthorizedEntryPoint is very simple and only defines that when an authentication error occurred the HTTP
status code 401 "Unauthorized" should be returned.
Http401UnauthorizedEntryPoint
@Component
public class Http401UnauthorizedEntryPoint implements AuthenticationEntryPoint {

    /**
     * Always returns a 401 error code to the client.
     */
    public void commence(HttpServletRequest request, HttpServletResponse response,
                         AuthenticationException arg2) throws IOException, ServletException {
        response.sendError(HttpServletResponse.SC_UNAUTHORIZED, "Unauthorized");
    }
}
The main entry point to check the delivered JSON Web Token is the StatelessAuthenticationFilter. This is a standard
Servlet Filter which intercepts any incoming HTTP requests.
StatelessAuthenticationFilter
@Component
public class StatelessAuthenticationFilter extends GenericFilterBean {

    @Autowired
    private TokenAuthenticationService authenticationService;

    @Override
    public void doFilter(final ServletRequest request, final ServletResponse response,
            final FilterChain chain) throws IOException, ServletException {
        final HttpServletRequest httpRequest = (HttpServletRequest) request;
        Authentication authentication =
            authenticationService.getExistingAuthentication(httpRequest);
        SecurityContextHolder.getContext().setAuthentication(authentication);

        chain.doFilter(request, response);

        SecurityContextHolder.getContext().setAuthentication(null);
    }

}
With the TokenAuthenticationService#getExistingAuthentication() we try to create an Authentication object based on
the JSON Web Token inside of the HTTP request header. If such a token was found and is valid the associated
Authentication is created and returned and set to Springs SecurityContextHolder. With the the following
chain.doFilter() the subsequent handling of the HTTP requests is processed. We must not forget the delete the
Authentication object at the end of the request handling, before the response is send back to the client.
Now we need to update our TokenAuthenticationService with the new getExistingAuthentication() method.
TokenAuthenticationService
@Service
public class TokenAuthenticationService {

    public static final String AUTH_HEADER_NAME = "X-AUTH-TOKEN";

    @Autowired
    private TokenHandler tokenHandler;

    public String createJwtTokenforAuthentication(final UserAuthentication authentication) {
        return tokenHandler.createTokenForUser(authentication.getDetails());
    }

    public Authentication getExistingAuthentication(final HttpServletRequest request) {
        final String jwtToken = request.getHeader(AUTH_HEADER_NAME);
        if (jwtToken != null) {
            try {
                final User user = tokenHandler.parseUserFromJwtToken(jwtToken);
                return new UserAuthentication(user);
            } catch (final UsernameNotFoundException | JwtException e) {
                return null;
            }
        }

        return null;
    }
}
The token is searched in the HTTP header X-AUTH-TOKEN and with the TokenHandler we get the associated User and
create a new Authentication object based on that user. If there is no token or the token could not be associated to
an user, we return null. Then the authentication in Springs SecurityContextHolder is set to null which means that
there is no authentication. The access to an secured web service will not be possible and the
Http401UnauthorizedEntryPoint ensures that a 401 "Unauthorized" is returned to the client.
The small extension of our TokenHandler tries to get the name of the user whose login created the token. With that
username the User instance could be loaded.
TokenAuthenticationService
@Component
public final class TokenHandler {

    @Autowired
    private UserLoginService userLoginService;

    /**
     * Try's to determine a {@link User} based on a JWT.
     *
     * @param jwtToken The JWT a user is searched for.
     * @return The found {@link User}.
     * @throws JwtException If the JWT isn't valid and was rejected.
     * @throws UsernameNotFoundException if the user wasn't found
     */
    public User parseUserFromJwtToken(final String jwtToken) {
        final String userName = Jwts.parser()
                .setSigningKey(JWS_SECRET)
                .parseClaimsJws(jwtToken)
                .getBody()
                .getSubject();

        return userLoginService.loadUserByUsername(userName);
    }

    [...]
}
Cross-origin resource sharing
The final missing part is the CrossOriginResourceSharingFilter. If the client of our web services is in another
domain than the server we have a cross domain request. E.g. the client runs on http://127.0.0.1:3000 and the server
http://127.0.0.1:8080 then we have different domains for client and server. If both were on the same domain there
would be no problem, but because of the different domains there will be a error like:
XMLHttpRequest cannot load http://127.0.0.1:8080/persons. No 'Access-Control-Allow-Origin'
header is present on the requested resource. Origin 'http://localhost:3000' is therefore
not allowed access.
Most clients running Javascript inside of a browser. Before the browser make the actual request to a RESTful web service
he asks the server with an HTTP OPTIONS request, if requests form the origin http://127.0.0.1:3000 are allowed.
This requests contains a Origin HTTP header:
Origin: http://127.0.0.1:3000
Only when the the server answers with an Access-Control-Allow-Origin in the response, the Browser will make the
actual request. Therefore we need to tell our server when there are incoming OPTIONS requests form
http://127.0.0.1:3000 to sent an Access-Control-Allow-Origin. This is what the CrossOriginResourceSharingFilter is
for.
CrossOriginResourceSharingFilter
@Component
public class CrossOriginResourceSharingFilter extends GenericFilterBean {

    private static final String CLIENT_URL = "http://127.0.0.1:3000";
    private static final String ORIGIN_HEADER = "ORIGIN";

    @Override
    public void doFilter(final ServletRequest servletRequest,
            final ServletResponse servletResponse, final FilterChain filterChain)
            throws IOException, ServletException {
        final HttpServletRequest request = (HttpServletRequest) servletRequest;

        if (request.getHeader(ORIGIN_HEADER) != null
                && originEqualsClientUrl(request.getHeader(ORIGIN_HEADER), CLIENT_URL)) { (1)
            setAccessControlHeader((HttpServletResponse) servletResponse,
                request.getHeader(ORIGIN_HEADER));
        }

        filterChain.doFilter(servletRequest, servletResponse);
    }

    private void setAccessControlHeader(final HttpServletResponse response,
            final String origin) { (2)
        response.setHeader("Access-Control-Allow-Origin", origin);
        response.setHeader("Access-Control-Allow-Methods", "POST, PUT, GET, OPTIONS, DELETE");
        response.setHeader("Access-Control-Allow-Headers",
            "Content-Type, Origin, Accept, Access-Control-Allow-Headers, Access-Control-Request-Headers");
        response.setHeader("Access-Control-Max-Age", "3600");
    }

}
This again is a servlet filter which will filter all incoming HTTP requests.
-
If the request contains an
Originheader we check if it comes from our known client athttp://127.0.0.1:3000. -
Here we define the response headers and allow our client access with predefined HTTP methods and headers.
Send some test requests
To send some test requests to the login web service you could use any type of HTTP client, like the good old
cURL or the Advanced REST Client. To obtain a new JSON Web Token
simply send a POST requests to our LoginRestController with the used credentials in the request body.
POST /login HTTP/1.1
HOST: 127.0.0.1:8080
content-type: application/json
content-length: 47

{
"username": "admin",
"password": "admin"
}
If everything works correctly the server will answer with status 200 OK and the response contains the new generated token in it’s body.
{
"jwtToken": "eyJhbGciOiJIUzI1NiJ9.eyJzdWIiOiJhZG1pbiIsIm5hbWUiOiJudWxsIG51bGwiLCJleHAiOjE0NzgzMzc4MTN9.OUQLPYRrKX-4xhjPkHZ2u05Y5begZpICiex5gR1-x6Q"
}
Subsequent requests to secured web services only needs to put the token in the X-AUTH-TOKEN HTTP header.
X-AUTH-TOKEN: eyJhbGciOiJIUzI1NiJ9.eyJzdWIiOiJhZG1pbiIsIm5hbWUiOiJudWxsIG51bGwiLCJleHAiOjE0NzgzMzc4MTN9.OUQLPYRrKX-4xhjPkHZ2u05Y5begZpICiex5gR1-x6Q
See a full working example at https://github.com/nerdcoding/angular2-spring-boot/tree/master/server